Coloring eggs is something that every kid looks forward to during Easter time. Whether you use store bought dye kits, make the dye with vinegar and food coloring or make your own natural dyes, the excitement of seeing the colors develop and change as they dry is something I remember from my childhood.
One of the ways we would decorate our eggs was to use different things to decorate them BEFORE we dyed them. This is now known as resist art, but to us at 10 and younger, we just thought it was brilliant!
In addition to these tried and true ways, I've also scoured the internet and my friends to find some fun ways to decorate your Easter Eggs this Year that I plan to try as well.
Basic Needed Items:
Hard Boiled Eggs
Dye - Several Different Colors
Food Coloring
Drying Rack or Oven Rack
Cans or Other Items to Hold Rack
Plus Items Specific to the Method Listed Below
Crayons:
- Use a crayon (white will show the egg shell while other colors will maintain their color after dyeing) to draw a design on the egg while still slightly warm for best results. If the eggs have completely cooled, you can place into a bowl of warm water to warm the shell up before you decorate. You can write names, draw lines or get super intricate.
- Once your design is drawn, put your egg into the dye and let sit until the color is as dark as you would like.
- Set the egg on a rack to dry. The dye will color the egg everywhere except for where there is crayon.
Stickers:
Kids love stickers! My favorite for this is plain old dot stickers.
- Place stickers onto the dry hard boiled eggs.
- When finished with design, put your egg into the dye and let sit until the color is as dark as you would like. Set the egg on a rack to dry. The dye will color the egg everywhere except for where there is a sticker.
- Once dry, remove stickers or leave them for even more fun!
NOTE: Stickers tend to allow the dye to soak through the edges which will not leave a clean distinct line. However, they still make for some cute designs if you're willing to try. Success purely is hit or miss for this one.
Baking Soda:
- Mix 1/3 cup baking soda with 1 Tablespoon water and 3 drops of gel food coloring into a paste consistency. Repeat for each desired color.
- Place an egg into each cup of a muffin tin.
- Wearing gloves, use a foam brush to cover the egg with the desired color(s).
- When the eggs are coated, use a spoon to drop small amounts of vinegar onto each egg. This will create a tie-dye design.
- When baking soda is completely dissolved, dip the egg into water to clean it.
- Place on rack to dry.
Rice:
- Place rice into a plastic cup or zip top bag, filling roughly 1/3 of the way for the cup or roughly 1.5 cups of rice for the bag (does not have to be exact and you can adjust as you see fit. Do this for each color you plan to have.
- When all the rice is ready, if using cups, place an empty cup next to each one, as you will need the second cup to help shake.
- Drop 10-15 drops of food dye into each rice container, one color for each one, and mix well until evenly distributed.
- Place an egg into one of the colored rice and shake until it is evenly covered in dye.
- If you want several colors on one egg, place the egg into each bag separately and shake.
- Set eggs aside to fully dry.
Paper Towels:
- Wrap your eggs in a paper towel - one for each egg.
- Using gloved hands, place drops of food coloring on the paper towel using desired colors but keeping some white space in between.
- Spray with vinegar mixture (1 cup water to 1 teaspoon vinegar) until saturated.
- Let sit for a minute or two to allow the colors to soak in.
- Carefully remove the paper towel to reveal your tie-dye design.
- Set out to dry completely.
Shaving Cream or Whipped Cream:
- Place a layer of shaving cream into a shallow dish.
- Use the desired colors of food coloring to make a design of drops on the shaving cream.
- Swirl through the drops with a toothpick or skewer.
- Roll eggs over the surface of the shaving cream.
- Let eggs dry.
- Wipe off any excess shaving cream.
NOTE: Do not eat eggs after dying with shaving cream! If you want to be able to eat the eggs, use the whipped cream in place of the shaving cream!
Silk Fabric:
- Wrap egg in a piece of brightly colored silk fabric (ties work well).
- Wrap with a piece of white cotton fabric (old t-shirt scraps work well).
- Place wrapped eggs into pot of cold water.
- Bring to a boil and cook for minimum of 20 minutes.
- Remove eggs to a rack and let them cool.
- Remove fabric and blot off any excess water.
- Throw silk fabric pieces away (design will not transfer again).
NOTE: Do not eat silk fabric dyed eggs! For decorative purposes only!
Tattoos:
Use temporary tattoos to decorate your eggs! Follow the same directions as if you are transferring onto your skin. Use your finger to gently press any loose pieces and then let dry completely.
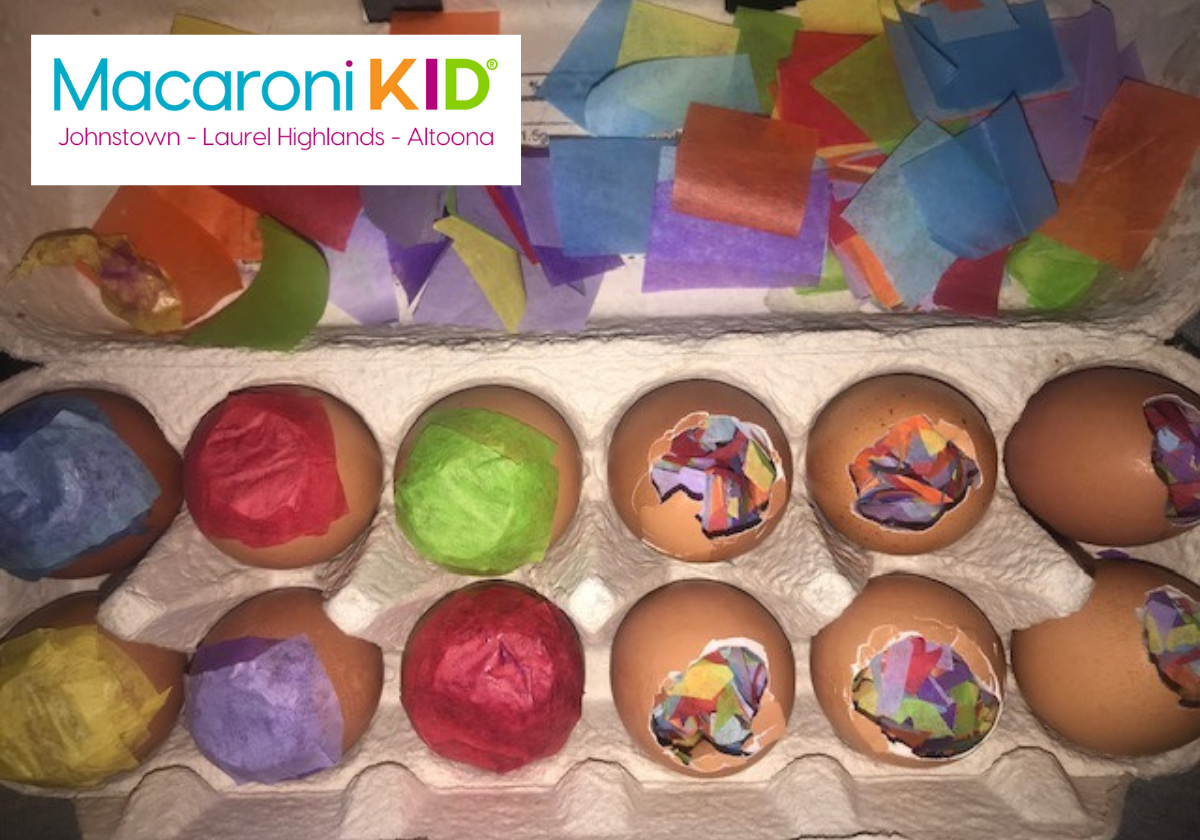
Cascarones:
Typically used in celebrations in Mexico, these eggs are meant to be broken! If you are a glitter-phobe, use tissue paper confetti instead!
- Decide how many you want to make first and gather your eggs - RAW eggs are used for this craft!
- Crack the top of the egg and drain the yolk into a bowl or sink. If you plan beforehand, you can save your shells from breakfast! If you didn't plan ahead, save the eggs in the fridge for use later.
- Rinse the shell out with warm water and pat dry.
- Using the egg dye of your choice, gently place the shell into the dye until it reaches the desired color.
- Allow to dry completely.
- Fill the eggs with the desired confetti, sprinkles, bird seed - you're only limited by your imagination. For heavier fillers, keep it to a minimum so that they don't break the covering.
- Using matching colored tissue paper, take a glue stick and place glue around the edges of the tissue paper.
- Gently apply tissue paper over the whole in the egg and allow to dry completely.
- Break your eggs when you're ready to celebrate!
These would be great surprise basket fillers for the kids!
 |  |
Regardless of the way you color your eggs, please remember that hard boiled eggs that have been out of the refrigerator for more than two hours should not be eaten!
If you want to use hard boiled eggs in your Easter baskets or as part of an egg hunt, set them out right before the kids wake up!
Hard boiled eggs can be refrigerated for up to a week.
 |  |  |